My Patch Management Process
Patch Management Process
Note
This was originally written as an SOP article for internal use at my organization. However, the base principles can be applied in any environment using Jamf Pro as an MDM.
Configure Software Title
Configuring software titles in Jamf is not required in order to Patch applications properly. However, it is recommended as it greatly simplifies the smart group creation process by using built-in criteria that would otherwise be unavailable.
- Log into Jamf Pro with your administrator account.
- In the sidebar on the left, click the Computers tab.
- Click the Patch Management tab in the sidebar. A list of software titles that have already been configured will appear. Ensure the software title has not already been configured by searching for it on the list.
- If the software title has not been configured, click New in the upper right hand corner.
- Click the chevron (
>) next to Jamf to load available software titles through Jamf. Once the list has loaded, search for the software title by using the Search field near the top of the list. - If the software title is available, click the plus (
+) to begin configuration.- In circumstances which the software title is not available, patching will have to be done manually. If using Composer, the article creating packages with composer outlines this process.
- Click Edit in the bottom right corner, use the Software Title Settings tab to configure basic settings for the software title.
- (Optional) Assign the software title to a category by selecting the Category drop down menu.
- If the software title uses an extension attribute, click the Extension Attributes tab and accept the terms.
- Click Save to finalize configuration.
Create Smart Groups
The naming scheme of your Smart Groups does not matter, but it is a good idea to remain consistent.
As an example, we prefix our Smart Groups withHas -for hosts that have a certain application installed, andLatest Version -for hosts on the latest version of the application. Choose what makes the most sense for you.
- If not already logged into Jamf Pro, login and navigate to the Computers tab.
- Click the Smart Computer Groups tab in the sidebar.
- Two smart group will need to be created for patching purposes:
- One will define who has the software title installed on their machine
- The second will define who has the latest version of the software title installed already
- Click New in the upper right hand corner to create the first Smart Group.
- Assign the Smart Group a name using the Smart Group naming standard you’ve chosen, followed by the application name.
- For example, if setting up patching for Microsoft Edge, the Smart Group name would be
Has - Microsoft Edge
- For example, if setting up patching for Microsoft Edge, the Smart Group name would be
- Click the Criteria tab, and then click Add on the far right hand side of the screen.
Using the Jamf Pro Documentation on Smart Groups as a guide, use the following criteria exactly as seen below.
Criteria Operator Value Application Title hasSoftware Title Goes Here.app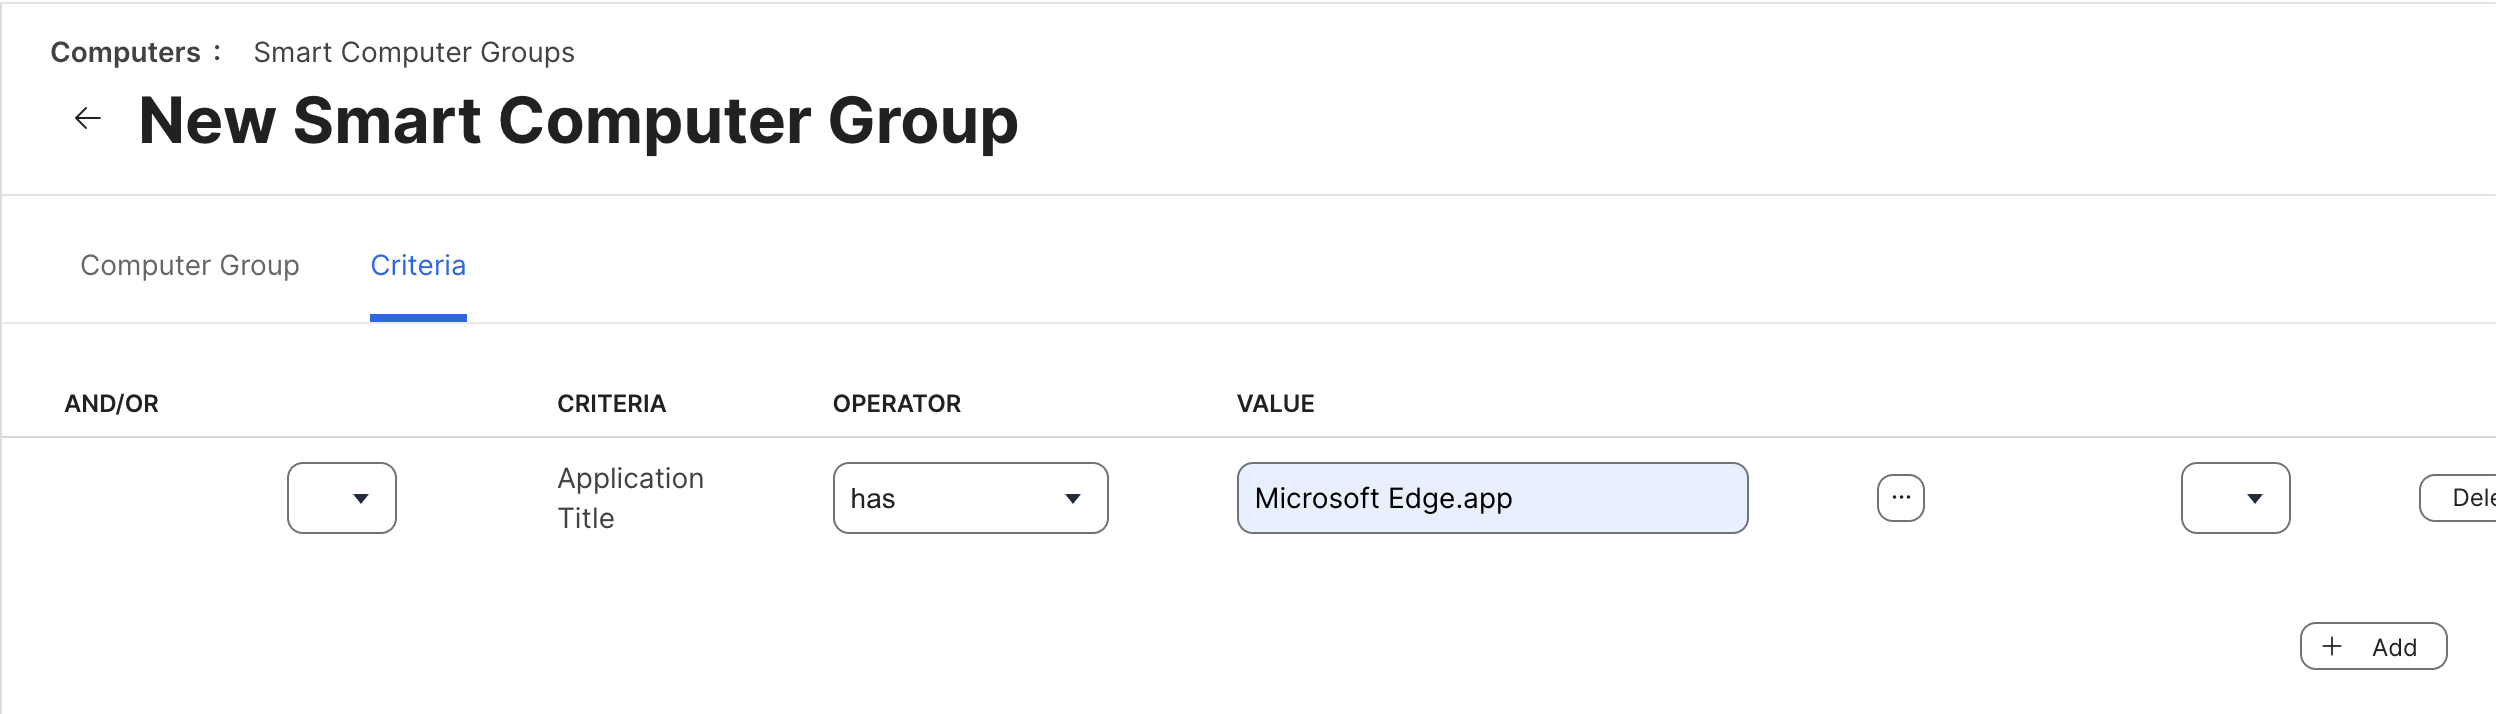 “Has” Smart Group criteria
- Click Save in the bottom right hand corner to save the first Smart Group.
Important
After saving, it is important to verify the criteria is working as expected. Click the View button in the bottom right hand corner to see a list of computers matching the criteria. If no computers are found, it could indicate an issue with the smart group criteria. - Click the Smart Computer Groups tab in the sidebar again, and click New to create the second Smart Group.
- Using the naming scheme you have chosen, name your latest version Smart Group.
- Using Microsoft Edge as an example again, the Smart Group name would be
Latest Version - Microsoft Edge
- Using Microsoft Edge as an example again, the Smart Group name would be
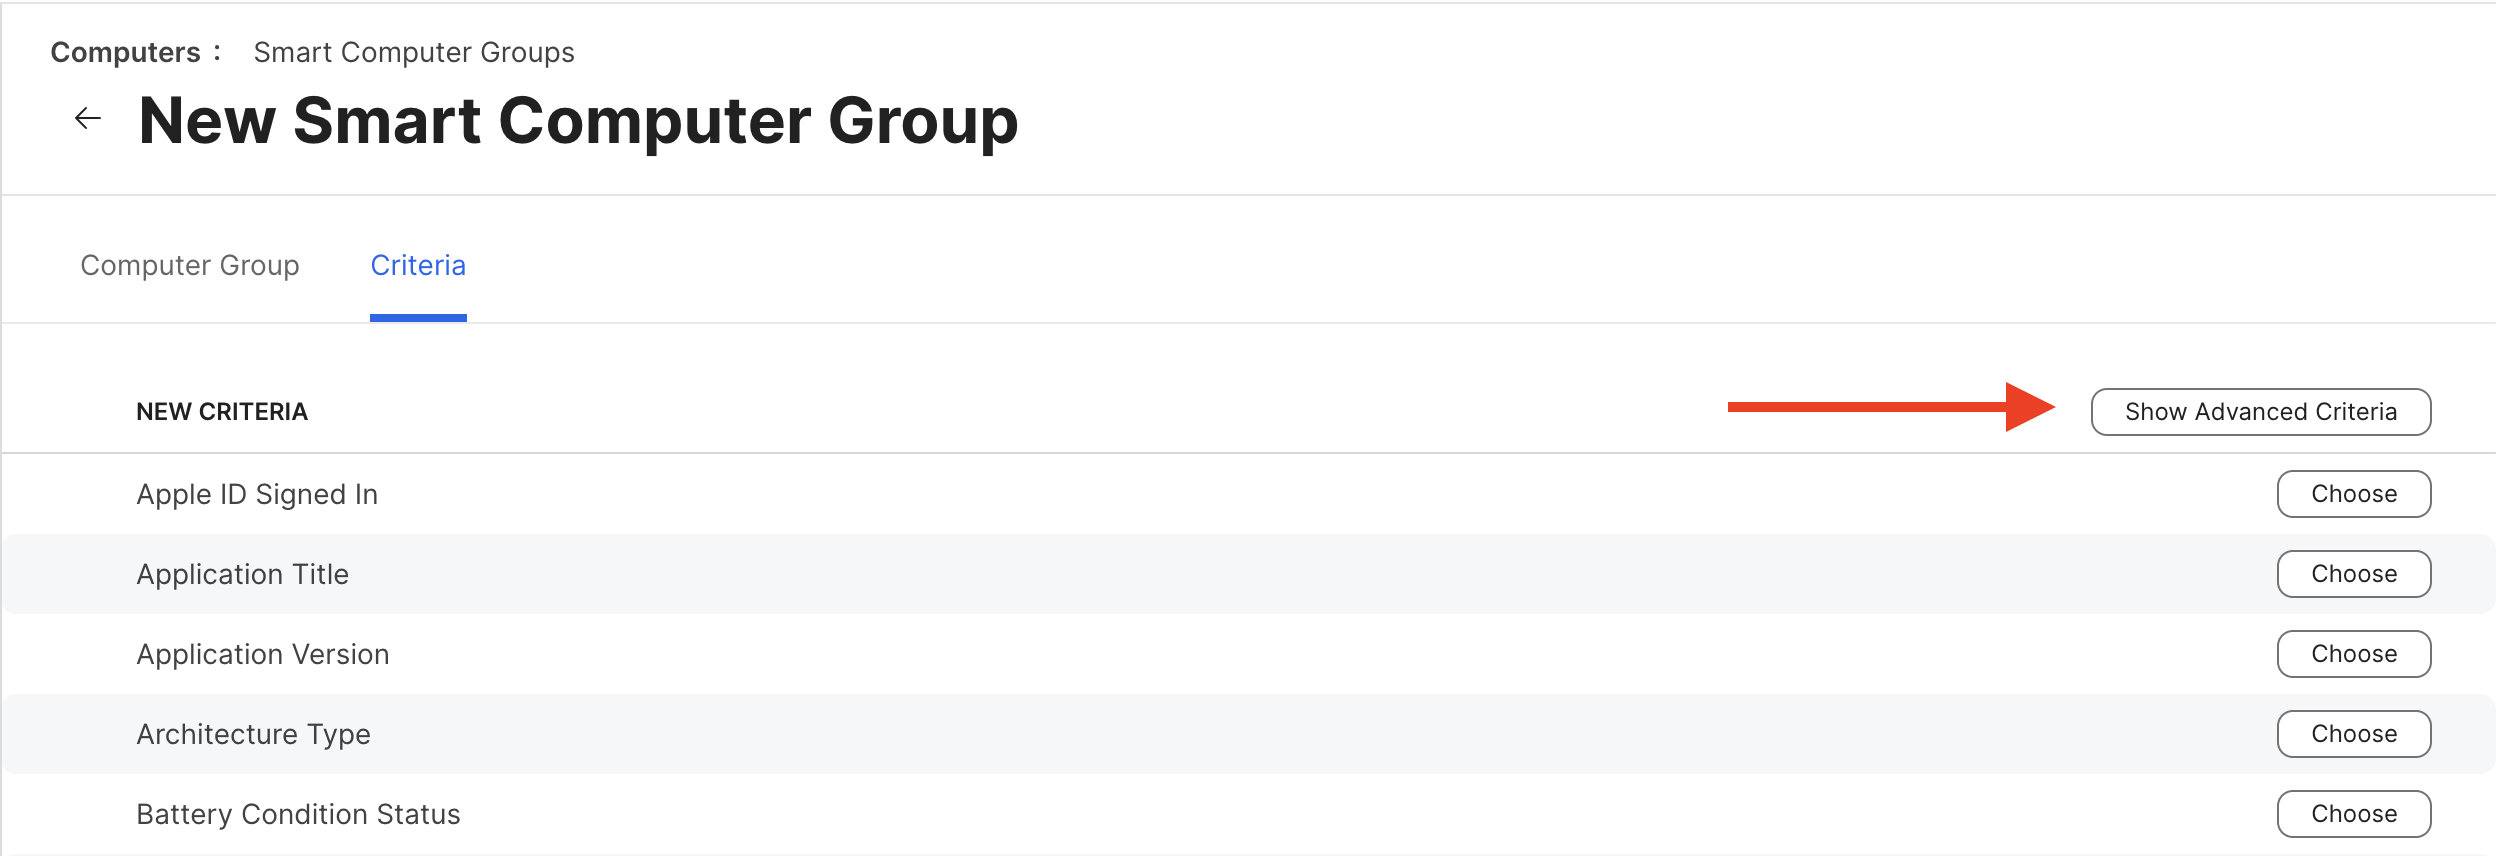
- Click the Criteria tab, and then click Add on the far right hand side of the screen.
Patch reporting criteria will not be on the first list of Smart Group criteria options. Click the Show Advanced Criteria button in the upper right hand corner to find the Patch Reporting options.
Use the following criteria to configure the logic for this Smart Group accordingly.
Criteria Operator Value Patch Reporting Software Title isLatest Version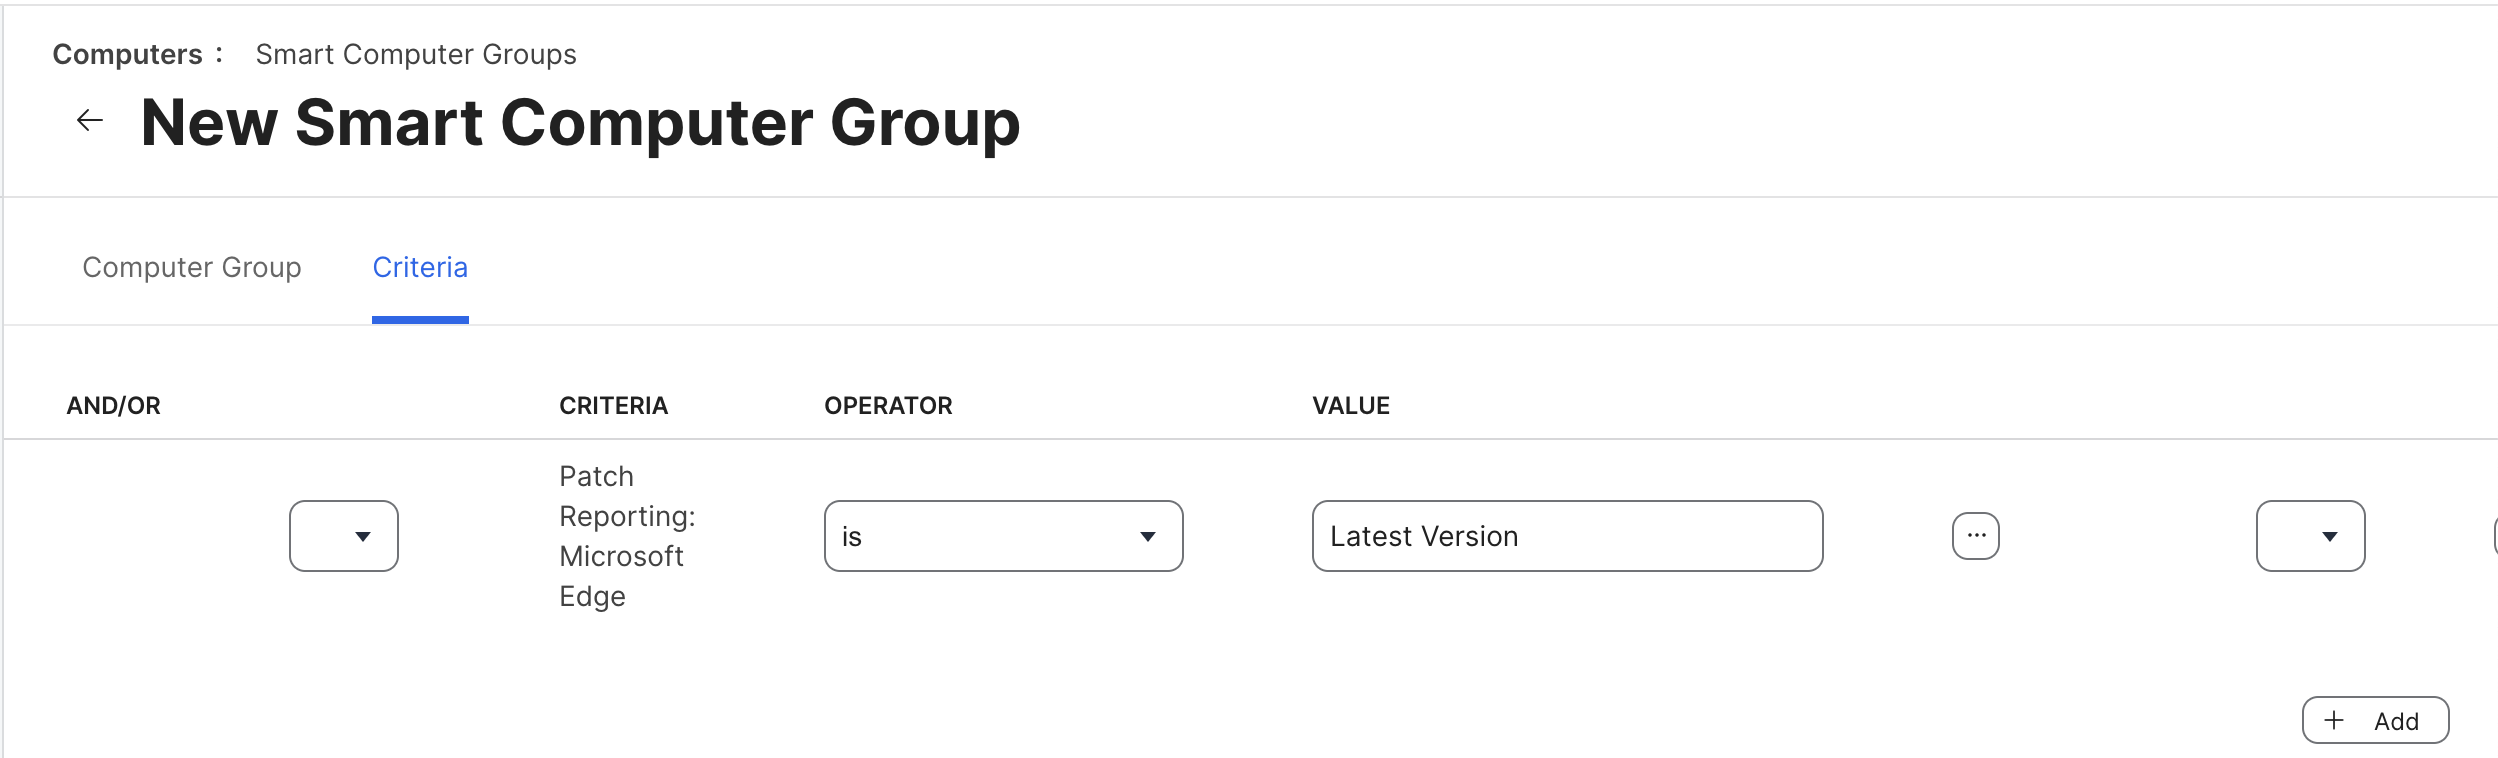 “Latest Version” Smart Group
- Click Save in the bottom right hand corner to save the second Smart Group. Verify the logic is working as expected by clicking the View button.
- There should now be two separate Smart Groups (where Software Title is the application you are patching):
Has - Software TitleLatest Version - Software Title
Installomator vs Composer
We rely on Installomator by default to automate our patch management process. If Installomator is not approved for use in your organization, alternate methods can be leveraged, such as Composer, Jamf App Installers or AutoPKG.
- Navigate to the Labels.txt file on the Installomator GitHub repository.
- Press
CMD + F(⌘F) on your keyboard to find the software title in question in the list.- Installomator’s labels are all lowercase and all one-word. Keep this in mind when searching for your software title.
- If the label exists, Installomator can be used for patching. If the label does not exist, the software title will need to be patched manually using Composer.
Create Policy
The Category, Trigger, and Execution Frequency referenced in step 4 are how we configure our patch policies but can be changed to meet the requirements of your environment.
- Back in Jamf Pro, click Policies under the Computers section.
- Click New in the upper right hand corner to create a new policy.
- The naming convention for patch management policies is
Patch Management - Software Titlewhere Software Title is the application we are patching. - In the General payload configure the following properties:
- Category - Patch Management
- Trigger - Recurring Check-in
- Execution Frequency - Once every day
- If using Installomator, follow steps 6-8. If using Composer, follow steps 9 & 10.
- Click the Scripts payload in the sidebar on the left, and then select Configure.
- Find the
Insallomator.shscript on the list that appears, and click Add. - Configure the following properties:
- Parameter 4 - Installomator label for software title (i.e.,
firefox) - For Parameters 4 & 5, reference Installomator docs to choose the configuration that works best for you.
- Parameter 4 - Installomator label for software title (i.e.,
- Click the Packages payload in the sidebar on the left, and then select Configure.
- Find the package that you uploaded to Jamf Pro on the list that appears and click Add.
- Navigate to the Maintenance payload in the sidebar on the left, and click Configure.
By default the Update Inventory option should be selected. If it is not, click the checkbox next to it to enable it.
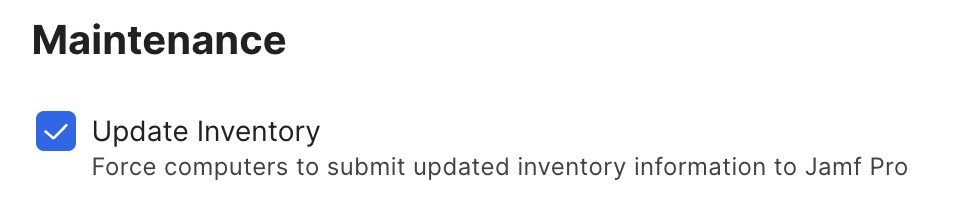
Important
Updating Inventory for patching purposes is necessary so Jamf can automatically put computers in the proper Smart Groups created previously.- Click the Scope tab near the top of the screen and configure the following properties:
- Targets -
Has - Software TitleSmart Group created previously - Exclusions -
Latest Version - Software TitleSmart Group created previously
- Targets -
- Click Save in the bottom right hand corner of the screen.
(Optional, but recommended) Add the Patch Policy to your Jamf Pro Dashboard for monitoring. Click the checkbox next to Show in Jamf Pro Dashboard in the upper right hand corner of the screen.
 Jamf Pro Dashboard checkbox
Done! 🎉
You now have a policy set up to update a software title automatically. If you used Composer to manually create a package, it is important to remember you only created an update for that specific version of the application in question. As soon as a new version is released, you will need to create another package for that application. If Installomator was leveraged, reference Installomator’s exit codes if your policies are failing.